Homemade Ice Cream Cakes: A Treat for Every Occasion
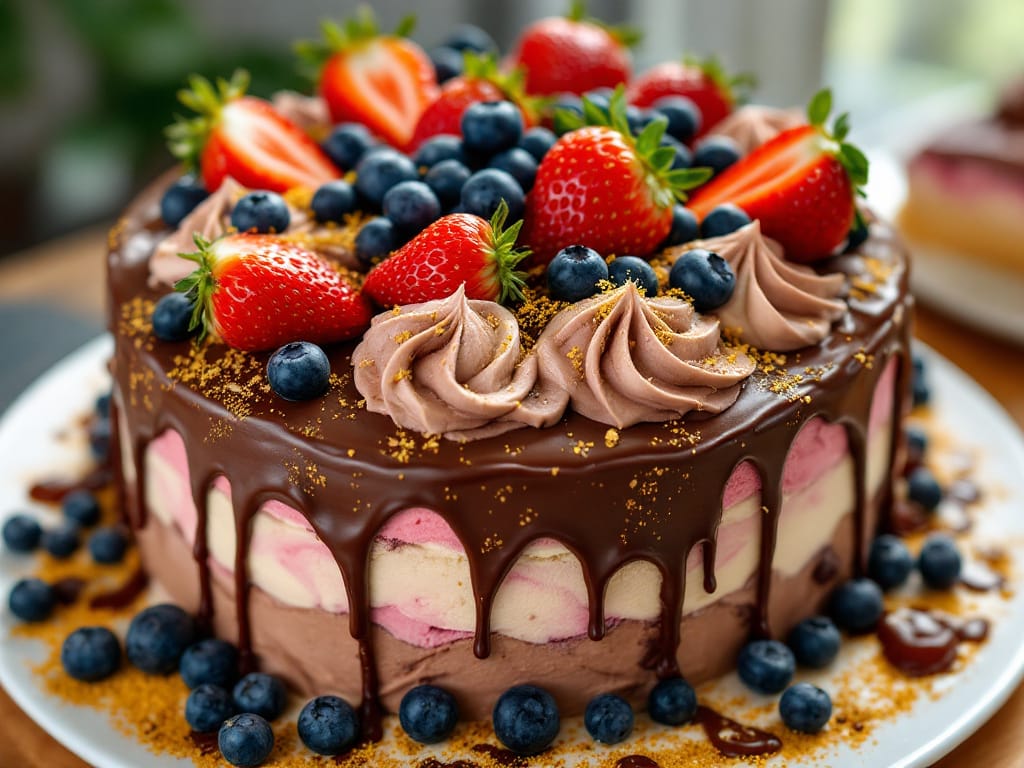
Homemade ice cream cakes are a show-stopping dessert that effortlessly elevates any celebration. Whether it’s a sunny summer barbecue, a festive birthday party, or simply an indulgent weekend treat, these cakes are guaranteed to impress. The best part? You can completely customize every layer with your favorite flavors and toppings, making each creation as unique and delicious as the occasion calls for.
With the right techniques, tools, and a bit of creativity, making your own ice cream cake is not only manageable but incredibly rewarding. Ready to dive in? Here’s everything you need to know, from essential ingredients to pro tips, to craft a dessert that’s as beautiful as it is tasty.
What Is an Ice Cream Cake?
An ice cream cake is a masterpiece of dessert innovation, combining the best of two worlds: cake and ice cream. Layered to perfection, it offers a delightful medley of textures and flavors. Traditionally, it includes layers of moist cake, creamy ice cream, and sometimes a crunchy surprise, such as cookie crumbles or rich fudge.
This dessert became widely popular in the mid-20th century and has since cemented its place as a go-to choice for celebrations, from birthdays to anniversaries. Its versatility and customizable nature make it a favorite for creating memorable moments.
To delve deeper into the history of ice cream cakes and how they’ve evolved into a dessert icon, check out this Homemade Marble Cake.
Essential Ingredients and Tools
Making a homemade ice cream cake is as much about having the right ingredients as it is about having the right tools. Here’s what you’ll need to get started:
Ingredients
- Ice Cream: Select two or three flavors that complement each other, like chocolate and peanut butter or strawberry and vanilla.
- Cake Base: A store-bought or homemade sponge cake works well to support the layers.
- Crunchy Additions: Crushed cookies, chopped nuts, or candy bits add delightful texture to each bite.
- Decorations: Whipped cream, colorful sprinkles, and chocolate drizzles elevate the cake’s appearance and taste.
Tools
- Springform Pan: Perfect for easy layering and removal of the cake.
- Parchment Paper: Ensures the layers don’t stick to the pan.
- Sturdy Knife: For clean, precise slices when serving.
For those with dietary restrictions or preferences, consider using dairy-free or vegan ice cream options. They are widely available and just as delicious. You can learn more about these alternatives Homemade Marble Cake.
Step-by-Step Guide to Making Your Homemade Ice Cream Cake
Follow these simple steps to create a dessert that’s as beautiful as it is delicious:
1. Prepare Your Ingredients
- Allow your ice cream to soften slightly for easy spreading. Avoid letting it melt completely.
- Trim the cake base to fit snugly into your springform pan if needed.
- Line the pan with parchment paper for easy removal.
2. Layer Your Cake
- Start with a layer of cake at the bottom of the pan to form a sturdy base.
- Spread a thick, even layer of softened ice cream on top.
- Add a layer of crunch, such as crushed cookies, nuts, or candy bits.
- Repeat these steps, alternating layers of cake, ice cream, and crunch, until you’ve used all your ingredients.
3. Freeze and Set
- Place the assembled cake in the freezer for at least 4 hours, though overnight is ideal to ensure the layers are solid and hold together.
4. Decorate
- Once the cake is fully set, remove it from the pan and place it on a serving plate.
- Use whipped cream to pipe decorative borders or cover the cake entirely.
- Add chocolate drizzles, colorful sprinkles, or even fresh fruit to make it visually stunning.
With these steps, your homemade ice cream cake will be ready to steal the spotlight at any gathering!
Tips for Customization
One of the best things about a homemade ice cream cake is the endless opportunity for personalization. Here are some creative ideas to make your cake truly unique:
1. Pair Complementary Flavors
- Combine classic flavors like chocolate and mint for a refreshing twist.
- Try strawberry and vanilla for a fruity and creamy balance.
- Experiment with adventurous combinations like coffee and caramel or coconut and mango.
2. Add a Surprise Layer
- Incorporate a layer of fruit puree for a burst of natural sweetness.
- Spread a layer of rich fudge or caramel between the ice cream layers for a decadent touch.
- For crunch lovers, include crushed candy bars or cereal between layers.
3. Use Holiday-Themed Decorations
- Add red and green sprinkles or peppermint candies for Christmas.
- Use pastel colors and edible flowers for spring celebrations.
- Decorate with mini pumpkins or candy corn for Halloween.
With these customization tips, your homemade ice cream cake will not only taste amazing but also reflect your personal style or the occasion you’re celebrating.
Common Mistakes to Avoid
Creating a homemade ice cream cake is straightforward, but a few common pitfalls can affect the outcome. Avoid these mistakes to ensure your dessert is a success:
1. Overloading Layers
- Adding too many toppings or heavy ingredients between layers can cause the cake to collapse or become difficult to slice.
- Keep layers balanced and avoid overpacking crunchy additions like nuts or cookie crumbles.
2. Improper Freezing
- Skipping the freezing step between layers can result in a messy and unstable cake.
- Always freeze each layer for 15–30 minutes before adding the next one. This ensures each layer is firm and stable.
3. Rushing the Process
- Patience is key! Rushing through the assembly can lead to uneven layers or melting ice cream.
- Take your time to spread each layer evenly and allow enough time for the cake to set properly in the freezer.
By steering clear of these mistakes, your ice cream cake will be picture-perfect and structurally sound!
Creative Serving Ideas
Enhance the enjoyment of your homemade ice cream cake with these innovative serving suggestions:
1. Pair It with Drinks
- Serve slices alongside hot chocolate or a steaming cup of coffee to create a delightful contrast between the warm beverage and the cold dessert.
- For adult gatherings, consider pairing with a glass of dessert wine, like Moscato or Port, to elevate the experience.
2. Use Leftovers Creatively
- Ice Cream Sandwiches: Use scraps of cake and ice cream to make handheld treats by pressing them together between cookies or wafers.
- Cake Pops: Roll leftover cake and ice cream into bite-sized balls, coat with melted chocolate, and refreeze for a playful mini-dessert.
These serving ideas add versatility and fun, making your homemade ice cream cake even more memorable!
FAQs: Everything You Need to Know About Homemade Ice Cream Cake
How Long Does an Ice Cream Cake Last?
An ice cream cake can last up to two weeks in the freezer if stored properly. Be sure to wrap it tightly in plastic wrap or aluminum foil and place it in an airtight container to prevent freezer burn.
Can I Use Store-Bought Ice Cream?
Absolutely! Store-bought ice cream works wonderfully for this dessert. It’s convenient and comes in a variety of flavors, allowing you to create exciting combinations without the need to make your own.
How Do I Prevent Melting During Transportation?
To keep your ice cream cake frozen during transport:
- Use a cooler with ice packs or dry ice.
- Keep the cake tightly wrapped to minimize exposure to warm air.
- Transport it directly to the destination and store it in a freezer immediately upon arrival.
What’s the Best Way to Cut an Ice Cream Cake?
For clean, precise slices:
- Use a sharp knife dipped in hot water.
- Wipe the blade clean between cuts to maintain smooth edges.
- Allow the cake to sit at room temperature for a minute or two to soften slightly before cutting.
These tips will ensure your ice cream cake is as enjoyable to serve as it is to eat!
Conclusion
making a homemade ice cream cake is a fun and rewarding way to create a personalized dessert that will impress any crowd. With the right ingredients, a little creativity, and some careful layering, you can craft a delicious treat tailored to your taste. Whether you’re sticking to classic flavors or trying something new, the possibilities are endless. So, gather your ingredients, follow the steps, and enjoy the process of making a show-stopping cake that will be the highlight of any celebration!

